Arma 3 is a military simulation game known for its open-world gameplay, realistic combat mechanics, and large-scale battles. Whether you’re engaging in tactical missions or playing in custom multiplayer modes like survival scenarios, the experience is greatly enhanced when hosted on a dedicated server. In this guide, we’ll explore how to set up an Arma 3 dedicated server, how to use Nitrado for hosting your Arma 3 server, and the benefits of hosting Arma 3 survival missions on a custom server.

Why Set Up an Arma 3 Dedicated Server?
An Arma 3 dedicated server provides numerous benefits, especially for multiplayer gameplay:
- Better Performance: Dedicated servers are optimized to handle large-scale multiplayer matches and custom mods, reducing lag and improving stability.
- 24/7 Availability: Your server will be online all the time, allowing players to join and leave whenever they want.
- Customization: You can customize game modes, mods, and settings to suit your preferences or create unique gameplay experiences, such as survival scenarios or role-playing missions.
- Larger Player Count: A dedicated server can handle more players than a regular hosted game, making it ideal for clans, communities, or public servers.
How to Set Up an Arma 3 Dedicated Server
Setting up an Arma 3 dedicated server involves several steps. Here’s a simple guide to get your server up and running:
Step 1: Install SteamCMD
SteamCMD is a command-line tool used to install and update dedicated server software for games available on Steam.
- Download SteamCMD from the official Valve site.
- Extract SteamCMD to a dedicated folder on your server machine.

Step 2: Download and Install Arma 3 Server Files
- Open SteamCMD and log in anonymously:Копіювати код
login anonymous - Install the Arma 3 server files:Копіювати код
app_update 233780 validateThis will download the dedicated server files for Arma 3. Once the download is complete, these files will be stored in the folder where you installed SteamCMD.
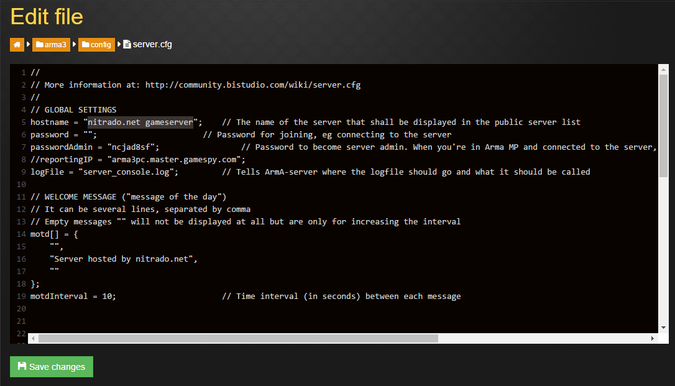
Step 3: Configure the Server Settings
- Create a Server Configuration File: Inside the Arma 3 server folder, create a new configuration file named server.cfg. This file allows you to customize server settings such as server name, player slots, password, and difficulty levels.Example of a basic server configuration:Копіювати код
// Server Configuration hostname = “My Arma 3 Dedicated Server”; password = “mypassword”; maxPlayers = 64; difficulty = “veteran”; voteThreshold = 0.33; votingTimeOut = 60;
vbnetКопіювати код
2. **Add Mods (Optional)**: If you’re using mods for your Arma 3 server (such as **Arma 3 survival** mods), you can specify the mod folder path in the configuration file to load them on the server.

### Step 4: Port Forwarding

To allow external players to connect to your **Arma 3 dedicated server**, you need to forward the appropriate ports on your router.

- **Ports to open**:
   - Game: **2302-2305** (UDP)
   - Steam Query: **27016** (UDP)

Go to your router’s configuration page and add port forwarding rules for the specified ports, directing them to the internal IP of the machine hosting the server.

### Step 5: Start the Server

Once your configuration is complete and the ports are forwarded, start your **Arma 3 server** by running the following command in the terminal or command prompt:
```bash
arma3server.exe -config=server.cfg
The server will now be live, and players can join using the server’s IP address.
Hosting an Arma 3 Server with Nitrado
If you want a hassle-free setup and professional server management, you can use Nitrado, a well-known server hosting provider. Hosting with Nitrado offers several advantages, including:
- One-Click Setup: Nitrado provides easy setup tools that allow you to launch an Arma 3 server without needing technical expertise.
- 24/7 Support: Nitrado offers customer support to help with any issues you may encounter during setup or server management.
- Mod Support: Nitrado servers support mods, including popular Arma 3 mods like Exile, Ravage, and Epoch for survival modes.
How to Set Up an Arma 3 Nitrado Server
- Visit the Nitrado Website: Go to Nitrado’s website and sign up for an account.
- Choose Your Plan: Select an Arma 3 hosting plan that suits your needs. Nitrado offers various server configurations based on the number of players you want to support.
- Configure the Server: After purchasing the plan, you can easily configure your server settings through the Nitrado web interface. Set the server name, player slots, difficulty, and password.
- Install Mods (Optional): Nitrado allows you to install mods directly from the Steam Workshop or upload your custom mods to the server.
- Start Your Server: Once configured, you can start your server with just one click. Players can join by searching for your server name or using the server’s IP address.
Benefits of Using Nitrado for Arma 3 Hosting
- Automated Backups: Nitrado offers automatic backups to ensure your server data is safe in case of crashes or issues.
- Global Server Locations: Choose from several server locations worldwide for optimal performance and low latency.
- Scalability: Easily upgrade your server capacity if your player base grows or if you want to host larger games.
Playing Arma 3 Survival Modes
Arma 3 survival modes have become increasingly popular, allowing players to immerse themselves in post-apocalyptic settings, scavenging for resources and battling enemies in a hostile world. Some of the most popular survival mods for Arma 3 include:
- Exile Mod: A survival mod where players must gather resources, build bases, and fight to survive against both zombies and other players.
- Ravage: A mod that transforms Arma 3 into a zombie apocalypse, complete with a hunger and thirst system, scavenging, and NPC bandits.
- Epoch: A survival mod that combines base-building, crafting, and survival elements in a sandbox world.
Setting Up an Arma 3 Survival Server
To host an Arma 3 survival server, you can either configure a dedicated server yourself or use Nitrado for easier setup. Here’s a brief overview:
- Download the Mod: Ensure the survival mod you want to run (e.g., Exile or Ravage) is installed on your server.
- Install the Mod on Your Server: Upload the mod files to your arma3server folder and configure your server.cfg to load the mod during server startup.
- Customize Survival Settings: Many survival mods allow you to tweak gameplay settings, such as loot spawn rates, zombie difficulty, and hunger/thirst mechanics.
- Start the Server: Once configured, start the server and invite your friends to join the survival experience.
Conclusion
Hosting an Arma 3 dedicated server allows you to customize gameplay, ensure better performance, and create an environment for you and your friends to enjoy. Whether you set up your server manually or use Nitrado for easier management, having a dedicated server provides flexibility and stability for multiplayer missions or survival scenarios. If you’re a fan of survival mods like Exile or Ravage, hosting your own server enables you to tailor the experience to your liking and enjoy the endless possibilities that Arma 3 offers.