DayZ, the popular open-world survival game, has captivated players with its harsh, post-apocalyptic environment and multiplayer dynamics. To maximize the DayZ experience, many players choose to host or customize their own servers. In this guide, we’ll explore how to configure DayZ servers, manage DayZ Nitrado servers, adjust Nitrado server settings, and delve into the DayZ flags list for greater control over your gameplay.
DayZ Flags List: Managing Territories
In DayZ, flags play an important role in territory management, especially on custom or community servers. Flags can be used to mark a territory, help players organize their bases, and give visual identity to camps or outposts. Each flag has its own unique design, and they are often used for various purposes such as marking ownership or showing allegiance to factions. Read also about free minecraft servers.
Common Flags in DayZ:
- Country Flags: DayZ includes many country flags like the US Flag, UK Flag, German Flag, and others, which players can use to represent their national identity.
- Faction and Custom Flags: Some community servers allow custom flags to represent player factions or in-game events.
- Base Flags: Flags can also help mark out player bases, making it easier for teammates to locate campsites and headquarters.
Using Flags in DayZ:
- Flag Poles: To use flags, players need to craft a flag pole. The flag pole is crafted with materials like logs, stones, and rope.
- Flag Durability: Flags slowly degrade over time, and once fully degraded, the territory might lose its protection from automatic item despawn. Replacing or maintaining flags is essential to keep your base secure.
Flags help with more than just aesthetics; they can also prevent items from despawning within a certain radius when attached to a flagpole, making them crucial for long-term base survival.
Hosting a DayZ Server with Nitrado
For players who want to host their own DayZ server, Nitrado is one of the most popular and reliable server hosting providers. Nitrado offers easy setup, mod support, and complete control over server settings, making it a great choice for both casual and experienced players.
Benefits of Using Nitrado for DayZ Hosting:
- User-Friendly Interface: Nitrado’s web interface allows for easy server configuration and management without requiring deep technical knowledge.
- Mod Support: Nitrado supports the installation of mods, so you can enhance your DayZ server with custom maps, weapons, vehicles, and more.
- Automated Backups: Nitrado servers come with automated backup options, ensuring your data is safe.
- 24/7 Availability: Your DayZ server will be available around the clock, allowing players to join at any time.
How to Set Up a DayZ Nitrado Server:
- Create an Account on Nitrado: Sign up for an account on Nitrado’s website.
- Choose a DayZ Hosting Plan: Select a plan based on how many players you want to support. Nitrado offers flexible pricing depending on server size and features.
- Set Up the Server: Once purchased, you can set up your DayZ Nitrado server through the Nitrado web interface. Choose your server name, region, and additional settings.
- Install Mods (Optional): If you want to use mods on your server, you can upload them through the mod manager in the Nitrado interface or through FTP.
DayZ Nitrado Server Settings: Customizing Your Experience
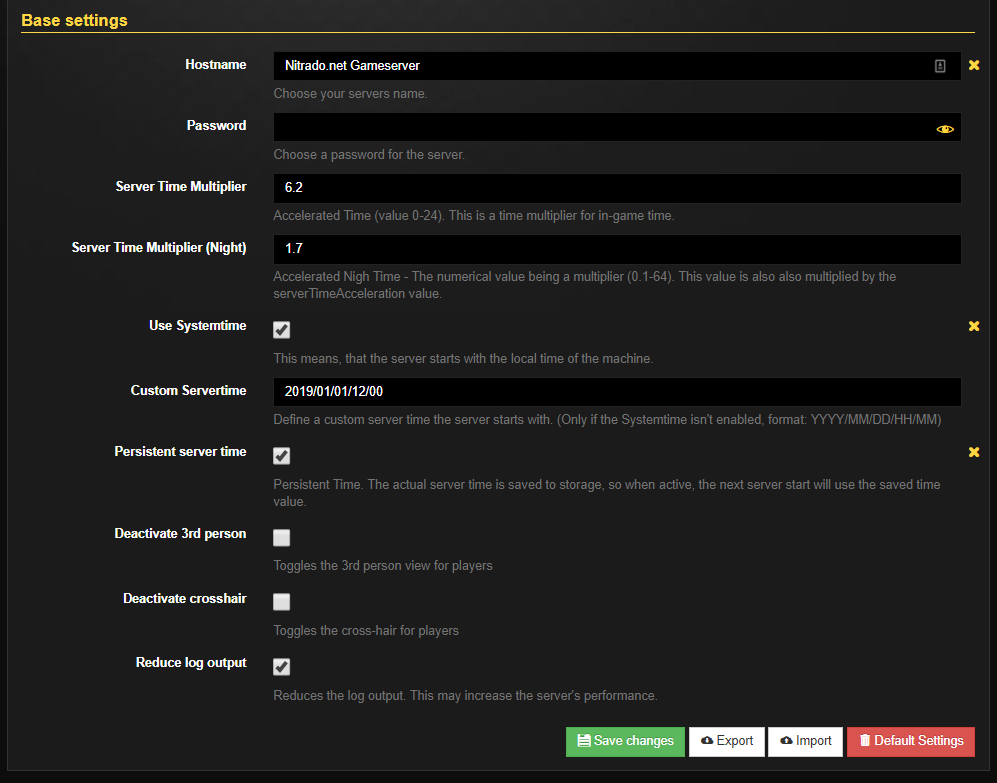
One of the major advantages of hosting a DayZ server on Nitrado is the ability to customize your server settings to tailor the gameplay experience. From loot spawn rates to weather conditions, DayZ Nitrado server settings allow you to fine-tune every aspect of your server.
Key Server Settings:
- Max Player Slots: Adjust how many players can join your server at one time. Depending on your hosting plan, Nitrado lets you scale this to suit your player base.
- Time Acceleration: Control the day-night cycle by speeding up or slowing down in-game time.
- dayzTime: Adjusts how quickly time passes. A lower value means time passes slower, while a higher value speeds it up.
- Loot Spawn Rates: Change how frequently loot spawns across the map.
- lootMax: Controls the maximum amount of loot that can spawn in specific areas.
- lootMultiplier: Adjusts how much loot is generated relative to the default game values.
- Zombie Spawn Rates: Increase or decrease the number of zombies that spawn in specific areas.
- zombieAmountMultiplier: A value of
1.0is default; lowering this value reduces zombie spawn rates, while increasing it makes them spawn more frequently.
- zombieAmountMultiplier: A value of
- Vehicle Spawns: Customize the number of vehicles that spawn across the map for players to find and use.
- Custom Weather Patterns: Control weather effects like rain, fog, and wind.
- Base Building: Adjust rules for base building, such as how long bases take to degrade or how much damage they can withstand.
How to Change Server Settings on Nitrado:
- Log In to Nitrado: Access your server dashboard through the Nitrado web interface.
- Select Your DayZ Server: Click on your DayZ server to manage settings.
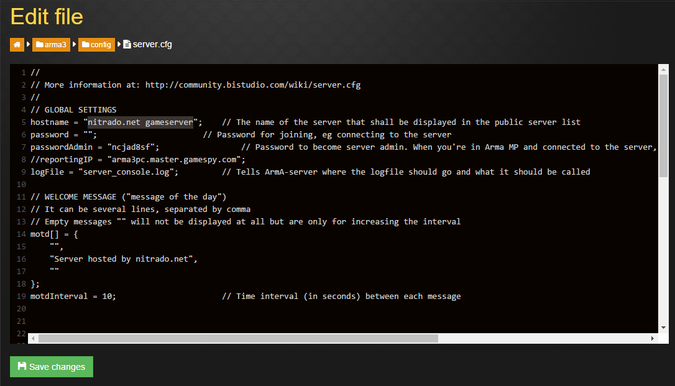
- Edit Configuration Files: Under the “Settings” tab, you can find the serverDZ.cfg file, which contains most of the customizable settings for your server. Edit this file to change parameters like time acceleration, loot settings, or player limits.
- Restart the Server: After making changes, restart your server to apply the new settings.
DayZ Server Configuration: Advanced Customization
To take full control of your DayZ server, you can manually edit the server configuration files. This is ideal for more advanced users who want to go beyond the basic Nitrado settings and tweak gameplay on a granular level.
Important Configuration Files:
- serverDZ.cfg: This is the main configuration file for the server and contains settings for server name, password, time acceleration, weather, and more.
- types.xml: This file controls loot tables and the spawning of items across the map.
- Usage: You can customize loot drop rates, item availability, and the chances of finding rare gear.
- events.xml: This file handles in-game events like helicopter crashes, dynamic events, and item spawn events. You can increase or decrease the frequency of these events.
- globals.xml: This file lets you control various gameplay aspects such as hunger, thirst, stamina, and damage.
How to Edit DayZ Server Config Files:
- Access Server Files via FTP: If you’re using Nitrado, you can access the server files via FTP or the Nitrado file manager.
- Download the Config Files: Download the necessary config files (e.g.,
serverDZ.cfg,types.xml) to your local machine. - Make Changes: Open the files in a text editor (such as Notepad++) and make the necessary changes. Be careful when editing XML files, as incorrect formatting can cause the server to crash.
- Upload the Modified Files: Once you’ve made the changes, upload the modified files back to your server via FTP or the Nitrado web interface.
- Restart the Server: Restart the server to apply your changes.
Conclusion
Setting up and managing a DayZ server—whether it’s through Nitrado or manually on your own hardware—offers endless customization possibilities. With full control over the server settings, flags, loot tables, and zombie spawn rates, you can create the perfect survival experience for you and your community. Nitrado makes the process easier with its user-friendly interface, while advanced users can dive into the server configuration files for more granular control. Whether you’re hosting a simple survival server or a heavily modded experience, DayZ allows you to craft the world you want to survive in.