Google Chrome is one of the most used web browsers nowadays. However, there are many errors such as Err_Connection_Closed. Although, the great thing about it is all can be fixed very easily and hassle free. You do not need any professional assistance to get rid of the fault. All you have to do is follow the below solutions and you would have resolved the frustrating issue.
In most cases, you shall get a code displayed on the screen such as this “Err_Connection_Closed”. It is a very common issue and can be resolved very easily. The issue does not allow you to browse the website you wish to and does not load the page. There are various causes of the error such as the invalid configuration of the network device. This happened due to mismatch of the server certificate. The only troublesome part is you won’t be able to access the web page you desire to view.
Google Chrome undoubtedly is widely used on most devices and is one of the most popular web browsers in the world. Before we get into solving the issue it is must to know what actually is the error Err_Connection_Closed. This glitch happens when the server of the website that you are trying to access declines the request of the data. It means when the chrome is trying to fetch data from the website the server is kicking it off the line. The key causes of the issue are due to outdated cache and data, bad DNS configuration or Outdated DNS Cache.
Read also: Error loading player: No playable sources found.
Solutions
There are various solutions you can try to get rid of the issue. Below are easy ways to resolve this frustrating glitch.
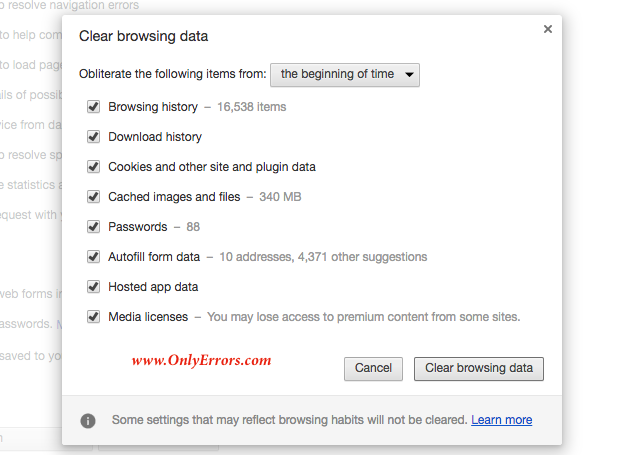
Solution 1 – Clear Internet Cookies and Cache
- Firstly, open your browser.
- Now, click on the setting tab on the top right side of the window.
- Open History from the options. You can also do this just by pressing Command +Y (for Mac OS) and Control + Y (for Windows).
- Next, click on clear browsing data.
- Select the following option from all the checkboxes listed “Cookies and other site plug-in data” and “Cached images and files”.
- Now from the drop down menu on the top select “from the beginning of time”. In most cases, it is set by default.
- Finally, click on clear browsing data button available at the bottom right corner.
Once done close the tab and restart your browser to check if the error still persists.
Solution 2 – Flush DNS and Reset TCP/IP
This solution can be used if the clearing the cache does not work. It is always better to first clear the cache and then check if the issue disappears. If it does not then use this method to solve the issue.
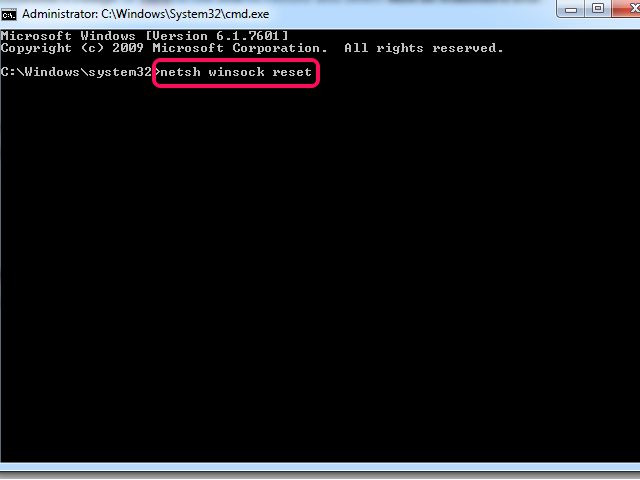
- Open the Run box by pressing Windows key + R.
- Then type cmd in the box to open a command prompt.
- Type the following “netsh winsock reset” and press enter.
- Restart your device.
If the above command does not resolve the problem then try the below commands and press enter after each command. Once done restart your PC.
- ipconfig /release
- ipconfig /renew
- ipconfig /flushdns
- ipconfig /registerdns
Check if the error has disappeared or still persists. If it still shows on your browser then try other solutions listed.
Solution 3 – Manually assign DNS
Manually assigning Domain Name Server can also love this troublesome fault. Below are steps to manually assign DNS on Windows as well as Mac OS.
Windows
- Press Windows Key + R to open the Run command.
- Type “ncpa.cpl” in the box to open Network and Sharing center.
- Select “Change Adapter Settings” from the available options on the left panel.
- Right click on the internet that the device is connected to.
- Click on Properties and then click on “Internet Protocol Version 4”.
- Again click on properties in the new window that opened.
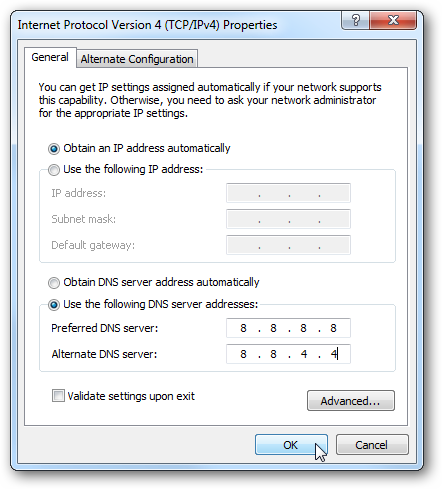
- Select “Use the following DNS server addresses” and type in the below addresses.
DNS Server 1 = 8.8.8.8
DNS Server 2 = 8.8.4.4.
Mac OS
Follow the below steps to manually change the DNS on Mac OS
- Open System Preferences and then go to network.
- Select the network the device is using.
- Then, press Advanced option at the right bottom of the window.
- Now, select the DNS tab from the menu at the top.
- Press “+” button and then enter the below DNS addresses.
DNS Server 1 = 8.8.8.8
DNS Server 2 = 8.8.4.4
Once done see if the error has disappeared or still exists. If you still encounte the issue then try other solutions listed.
Solution 4 – Reinstall Google Chrome
- Go to Start menu and open Control Panel.
- Open Programs and Features option from the available ones.
- Now, look for Google Chrome and right-click on it to uninstall.
- Wait few minutes and let the program uninstall.
- Once it’s done reinstall it again or download the latest version go google chrome from the official website.
Voila! You are all done with uninstalling and again reinstalling Chrome. In most cases, this should all the existing glitches.
Solution 5 – Run a Malware Scan
At times the issue might arise due to some malware. Below are steps to run a full malware or virus scan.
- Go to Start Menu and search “Microsoft Security Essentials”.
- Click on it o open it.
- Now, press the “Full option” to run a complete malware scan.
- Then, click the “Scan Now” option.
- Let the device complete scanning.
Once done close the tab and open the browser to check if the glitch still persists or not.
The above solutions will surely solve the error. In most cases, doing one of the above will resolve the error Err_Connection_Closed. However, if one solution does not then try other solutions available. Hope this above will resolve the issue.