The Windows Error Code 0x8007045D is an ordinary issue that many of us encounter. There is no need to worry as it is a common fault and is easy to fix it. The issue is a not a serious issue but not solving it can harm the computer in a serious manner. The fault usually causes blank screen, the computer hangs, Blue Screen of Death. Although the BSoD is rare and usually does not occur due to this glitch.
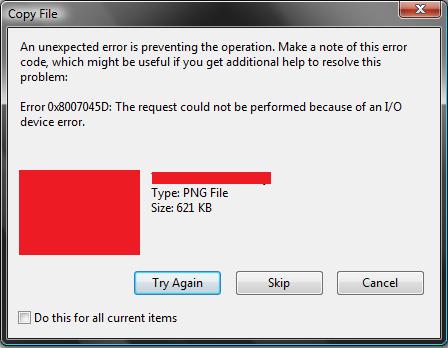
The problem occurs while backing up computer applications on external storage units. However, it can also show up while reinstalling the operating system. Generally, the messages that come with the error are “Windows can not install required files. Make sure all files required for installation are available.Error Code: 0x8007045D” OR “Error 0x8007045D: the request could not be performed because of an I/O device error.”
Read also about: Windows Update Error 8007000E.
Causes of the Error 0x8007045
- Virus on the computer.
- The hard disk has bad sectors.
- Registry files are corrupt.
- The memory modules are damaged.
- The installation USB is damaged.
Solutions for the Error 0x8007045D
There are many ways to get rid of the issue. However, the solution entirely depends on the cause of the issue. Therefore, it is best to try different methods in order to get rid of the problem. The exact solution that solves the error will inform you why the issue occurred in the first place.
Solution 1 – Basic Methods
At times these simple ways get rid of the issue. When the problem occurs while backing up applications, the basic primary way to get rid of this is to use a different backup media. Also, it is important that there are no faults in hardware such as DVD drive. Additionally, using a different USB port helps when the glitch occurs while reinstalling the OS.
Solution 2 – Repair Hard Disk
Repairing bad sectors on the hard disk is a must in order to avoid further damage. These bad sectors do not allow to recover data. Therefore, the operating system cannot load mandatory files. Using the built-in repair tool can quickly resolve this issue.
- Click on Windows key to open the menu.
- Select “Command Prompt” and click “Yes” if it prompts to access with administrator rights.
- In the Command Prompt window type the following “chkdsk C: /f /x /r” and press Enter.
- Running the command identifies any corrupt files on the drive and other parameters fix the issue. The letter “x” indicates to dismount drive prior to the start of the scanning process. The letter “r” instructs to find bad sectors on the disk and the character “f” notifies the utility to repair errors. To run the service dismounting of the disk is essential.
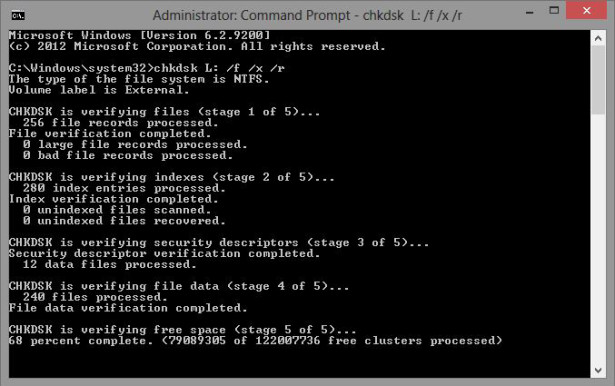
Wait patiently for the scan to complete and restart the PC. Go back to back up the application and check if the issue still persists or not.
Solution 3 – Compress the hard disk
This method helps is useful when the issue occurs while backing up files to external drive. The solution will work if the external hard disk is in good condition. Here are steps to do so.
- First, click on Start and open the option “Control Panel”.
- In the resultant window select the option “System and Security”.
- Next, on the system and security screen click “Create and format hard drive partitions”.
- On the Disk Management screen, right-click on the drive that you wish to compress.
- Finally, click on the option “Shrink Volume.”
- Continue with on-screen instructions and restart your computer.
Solution 4 – Disable Anti-Virus Program and Firewall
Running the antivirus software and also backing up programs at the same time can cause conflicts. Therefore, all you have to do is is disable the firewall temporarily and see if the issue is resolved. Once done, disable the firewall. Here are steps to do so.
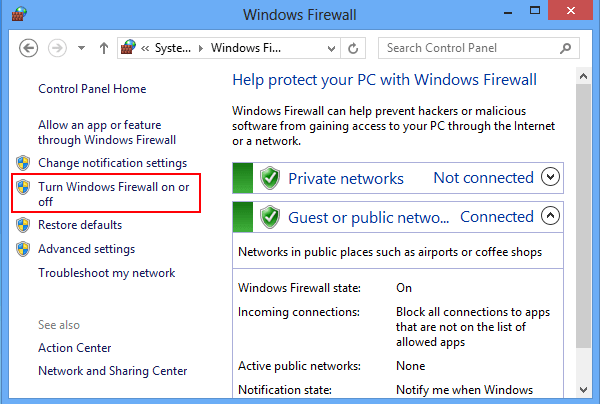
- To open the Run window, press Windows Key + R.
- Next, type the following “firewall.cpl” in the run box.
- Now, from the left pane select the option “Turn Windows Firewall On or Off”.
- Click “Turn off Windows Firewall”.
Check if the issue is resolved. If it still persists then firewall and antivirus are not the cause of the problem.
Solution 5 – Run computer in Safe Mode
It is recommended to start the PC in safe mode and back up files. Also, in safe mode, only some programs run therefore the chance of conflict reduces. It is the best way to backup files as well as reinstall operating system.
- Press the Windows key to open “Start Menu” and select the option “Search programs and files.”
- In the resultant box “msconfig” and then hit Enter.
- On the System Configuration applet, click on the “Boot” tab.
- Proceed to “Safe Mode” and look for “Minimal”.
- Now, click “OK” on the pop-up box that appears.
- Finally, click on “Restart”.
Now try to backup files and see if the issue appears.
Solution 6 – Fix Windows Installation
Repairing the installed OS can be very effective in fixing the issue. However, one must use this method after trying all the above solutions. Here are the steps to do so.
- Start the PC and insert the original operating system installation media.
- Next, keep pressing F2 to configure the PC to boot from the installation media. Note: Some versions of the OS have another dedicated key than the F2.
- Save the configuration and restart the computer.
- A prompt will display, press any key to continue.
- Click “Next” and then press the button “Repair your computer”.
- Follow on-screen instructions.
- Finally, restart your computer and see if the error still persists.
Solution 7 – System Restore
If a restore point is a setup in advance, then a good option is to restore the Pc back to a previous date when the issue didn’t occur. This resolves the problem as at time a newly downloaded program may have interfered with the registry files. Here are steps to return the device back to older date. Note: These steps are for Windows 8 but it provides a fair idea of all versions of Windows OS.
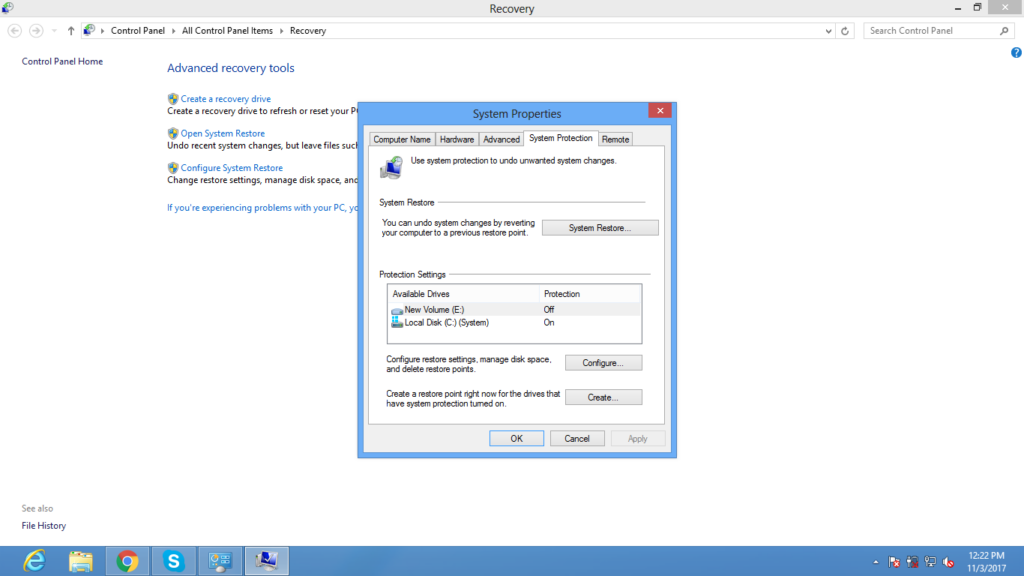
- Press the Windows + Q Key.
- From the available options click on “Settings”.
- Select the “Recovery” icon.
- From the resulting window choose ”System Restore”.
- Now select the date when the computer didn’t have any issues.
- The tool will begin and shut down the PC.
- The restore process will end once the PC restarts.
Now try to backup files or reinstall OS to see if the issue still hogs the computer.
If none of the above solutions work, the last option is to replace the hard disk. However, keep this as the last resort. This will also solve the error that occurs while reinstalling OS. Hope the above solutions help get rid of the troublesome Error Code 0x8007045D. In most cases, basic fixes will solve the problem. Only in rare case, a complex solution is required.