The Windows Taskbar received quite a lot of attention while Microsoft was testing Windows 10. Although the new functionalities are great it does have some problems in functioning properly. The look of it has changed and so has operative manner. This article will in detail provide the fix to the frustrating issue.
Several changes were made in the new taskbar where easy search option was available with Microsoft’s personal assistant Cortana. The addition of Cortana has been very useful one as it allows to assign tasks to it very easy and hassle-free. It made life less complex with the incorporation of Cortana. Another great addition to it was the Task View Icon. This feature allows users to view current active windows which provide an effortless way of making virtual distinctive instances. However, some problems have also occurred due to the new additions.
Solutions
Unresponsive taskbar gives a very bad experience to a user. If it freezes or is not working well then find below solutions to resolve the issue. There are many ways to get rid of the fault, which is listed below.
Solution 1 – Restart Windows Explorer
One of the simplest solutions is to restart the explorer which will completely restore the taskbar. Here are steps to follow:
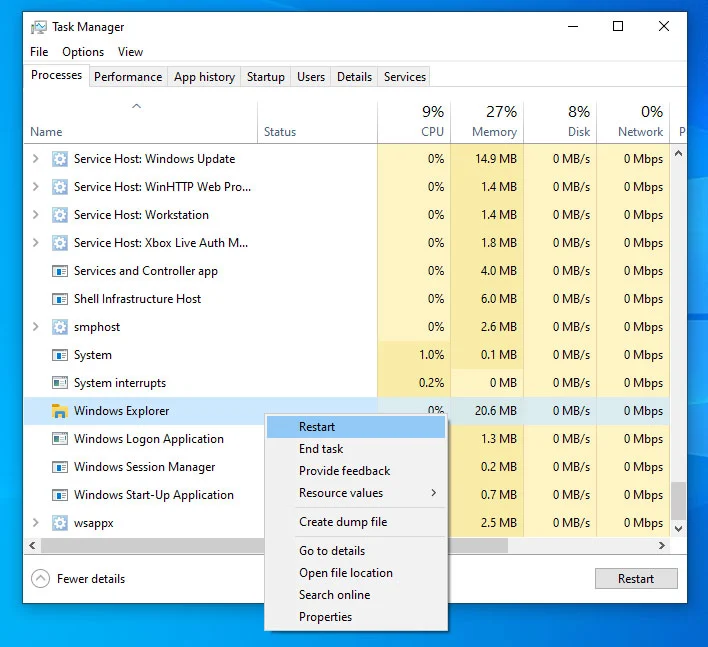
- Firstly, to open the task manager press the following keys Ctrl + Shift + Esc.
- Next, go to the Processes tab on the top of the window and select “Windows Explorer”.
- Then click Restart.
Once done check if the taskbar is functioning normally or is still not working. In some cases, the issue might occur due to bad explorer add-ons. In that case, all you have to do is locate the disturbing addon using trial and error method. Once you find it disable it or remove to fully get rid of it.
Read also: The error DPC_WATCHDOG_VIOLATION.
Solution 2 – Restore Indexing Services Using Windows Troubleshooter
- Press Windows Key + R to open the Run Command window.
- Type “Control Panel” in the command box and press Enter.
- Next, click on Troubleshooting and then click on System and Security.
- Further on right-click on Search and Indexing.
- Once done select the option Run as Administrator.
- Now, the troubleshooter will run.
- A list of checkboxes will be displayed. In this tick, the following “Files don’t appear in search results”.
- Then click Next.
The troubleshooter will find the issue and try to fix it. If it does not detect the problem the try other solutions.
Solution 3 – Repopulate Taskbar Using Command Prompt
At times in the Windows 10 taskbar does not work. Moreover, the icons and tray placed at the bottom right such as clock and other functions disappear. This is a very common and frustrating error. However, it can be fixed using the common interface. Here are steps to do so.
- Press Windows key + X to open the quick link menu.
- Then open Command Prompt from the available options. Make sure you to input the administrator credentials.
- Now to open the Disk Image Servicing and Management input the following code in the common prompt window “DISM /Online /Cleanup-Image /RestoreHealth”
Once done check if it appears and is functioning well. In most cases, the issue won’t resurface.
Solution 4 – Registering the Taskbar (Again)
If the above solutions do not get rid of the issue then try using Windows Powershell. What is Powershell? It is a command-line tool that arranges and organizes system setting, In addition to it also automates Windows tasks. Before using the tool a system restore point must be created. Once done follow the below steps.
- Press the Windows Key and in the search bar type “PowerShell”.
- Right-click on the application and select the option Run as Administrator.
- If a window pops up with options YES or NO, click on YES.
- Now input the below code in the PowerShell window and press Enter. Get-AppXPackage -AIIUsers I Foreach {Add-AppxPackage -DisableDevelopmentMode -Register “$($_.InstallLocation)\AppXManifest.xml”}
- Once this command is carried out successfully go to this directory “C:/Users/name/AppData/Local” in the Explorer. Note: You have to go where the name is your Account Username. Also, it is important that show hidden items is enabled.
- Find and delete the folder “TileDataLayer”.
- If you can’t delete the folder then Press Windows Key + R to open Run command.
- Input this command “services.msc ”in the command box to open the Services Manager
- Next, find the Tile Data Model server and right-click on it. Select the opting Stop to proceed.
- Now, delete the folder which you were unable to do so.
After this check, if it functioning properly and does not have any issues. In most case, this should resolve the windows 10 taskbar not working issue.
Solution 5 – End Cortana’s Process
Cortana as mention earlier is one of the finest addition to the taskbar providing great user experience. However, at times the reason the taskbar not working maybe due to Cortana. Here is how you can solve it. Ending the process might solve the issue and you need not worry as it will automatically restart straight away.
- First, right-click on the Start button and open Task Manager.
- Then click on Cortana and press End Task.
Cortana will immediately be available after ending its process. Now check if the taskbar in Windows 10 is functioning well.
Solution 6 – Establish Startup options plus restart Window Search
At times the Pc while startup gets confused and does not start the Windows Search. In this case, all you have to do is go into Services and Setting Startup Parameter and restart the Windows Search. This will definitely get the taskbar working again. Here is to do it.
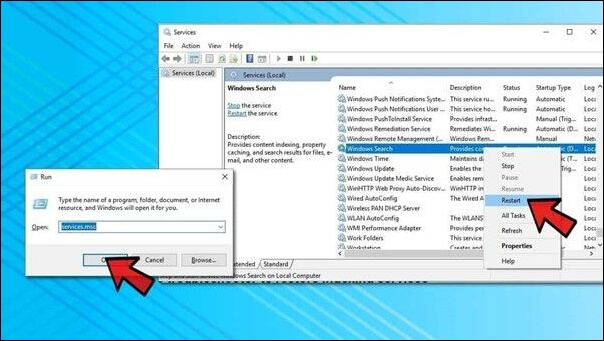
- Press the Windows Key + R to open the Run Window.
- Next, type in the following in the Run box “services.msc”. Note: The inverted commas are not to be typed.

- Now, Press OK to proceed.
- Right-click on Windows Search and then click the option “Properties”.
- Next, press on the drop-down menu that is next to Startup type.
- Choose this option Automatic or Automatic (Delayed Start) based on your preference.Click on Apply and press OK.
- Once again right-click on Window Search and click restart.
Solution 7 – Create a fresh user account
This is the last resort one can do to get rid of this issue. If the above solutions have not worked and the taskbar is still not functioning as it should then try to create a new user account. Below is how to create a new user account.
- Press Windows key + I to open the Settings app.
- Go to Accounts> Family & Other Users.
- Now under the Other Users section select the option “Add someone else to this PC”.
- Now follow the on-screen instructions to proceed with the account creation process.
Once done, you will be able to login with the new account and the taskbar issue will also be resolved.
The above are some solutions that can help you in getting rid of Windows 10 Taskbar not working fault. In most cases, one of the solutions can do the trick. However, if it does not then try multiple solutions for the same. Hope these solutions help you in getting the taskbar working normally again.